

Hey guys, are you trying to install Windows Subsystem for Linux in Windows? Here is the detailed installation process.
Firstly, we need to have the following system configurations and specifications to install WSL2
- Genuine Windows Operating System
- For x64 systems: Version 1903 or higher and Build 18362 or higher.
- For ARM64 systems: Version 2004 or higher and Build 19041 or higher.
- Builds lower than 18362 do not support WSL 2. Use the Windows Update Assistant to update your version of Windows.
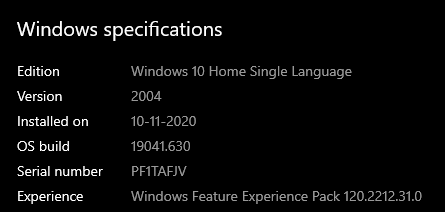
To see your system configuration, go to settings from the start menu – choose the system – followed by About windows specifications are shown on the panel.
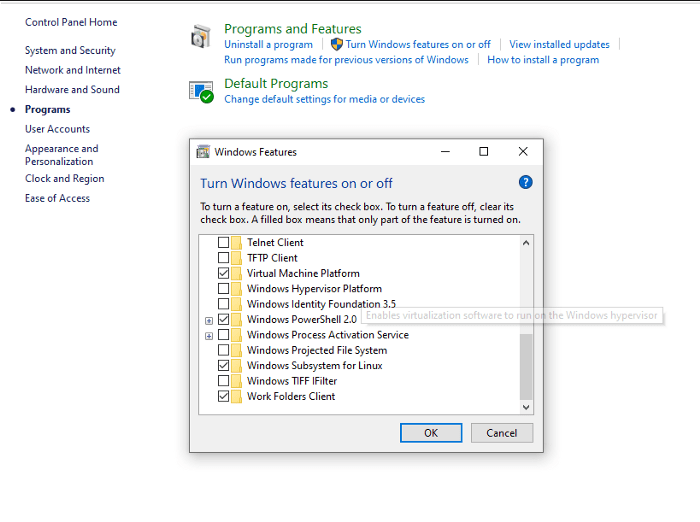
STEP 1: Enable Virtual Machine feature and the WSL
Prior to installing WSL2, you need to enable the virtual machine platform optional feature and windows subsystem for Linux feature, for that you have to Go to Control panel – select programs – then choose to Turn Windows features on or off and you need to enable “Windows Subsystem for Linux” followed by “Virtual machine platform” in the newly opened windows panel.
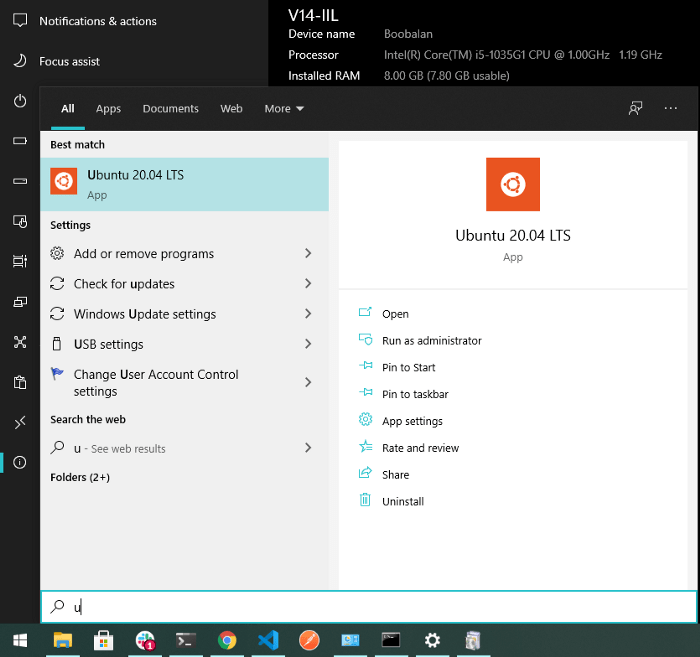
STEP 2: Install your Linux distribution of choice and Windows Terminal
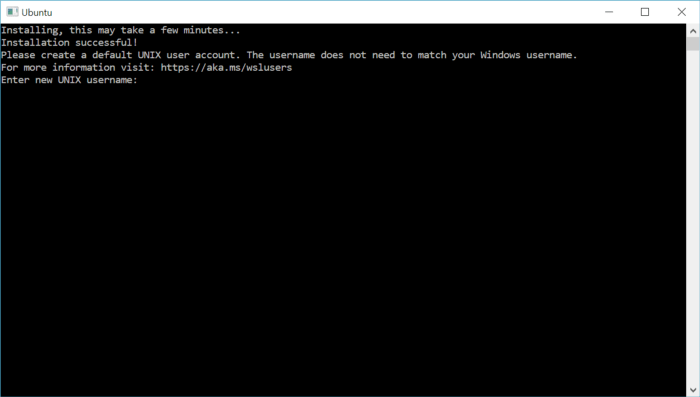
In the second step, you have to download and install Ubuntu 20.04(latest) and Windows Terminal from the windows store, once installed you can run the ubuntu as an application to configure from the start menu.
Once you open the Ubuntu App, it will ask you to set up the Username of your Ubuntu system and followed by the Password.
STEP3: Download the latest package of Linux Kernal
Once you successfully set up a password then, you have to enable wsl2, for that we need to install the Linux kernel from the windows site, If you’re using an X64 machine please click here or if you are using an ARM64 machine please click here download.
Once the installation is complete, move to the upgrade WSL2 step, setting WSL 2 as your default version when installing new Linux distributions. (Skip this step if you want your new Linux installs to be set to WSL 1).
Step 4 – Set WSL 2 as your default version
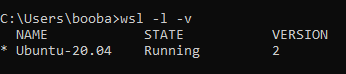
You can see your WSl version of your running Ubuntu by following command in PowerShell
wsl -l -vthe above command will show the as like the following image
Next, you have to set the version of your Ubuntu with the following Command
syntax
wsl --set-version

# example, if you are using Ubuntu-20.04 OS, then code should be like
wsl --set-version Ubuntu-20.04 2
Next, you have to set the default version of your Ubuntu, for that Follow the commands
wsl --set-default-version 2STEP5: Setup your Terminal
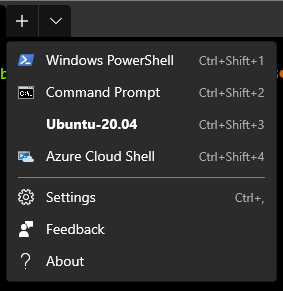
If you open the terminal it will load automatically to Windows Powershell but the terminal can also work with Ubuntu, Microsoft Azure, and as a command prompt. You can see those things by clicking the drow down arrow in the Terminal tab section.
and If you wish to set up your Terminal to load automatically with ubuntu or have to load your project path as default, you have to edit your settings (Shortcut: CTRL + Comma) and you can copy-paste my settings JSON. If you have any doubt, please comment on the gist itself.
Note:
explorer.exe .
## the above code will open your Ubuntu Current Path
That’s it. You can go ahead, install ZSH, Ohmyzsh, git, ruby, rails, PostgreSQL, Redis, etc. If you need any help, you can comment below or mail me at boobalan.r@wp.spritle.com