
Hi everyone, hope all are doing good. I’m here to share my first work experience as a Healthcare Intern at Spritle Software. At first, I felt that I was left all alone since my first ever job was work from home. Yes, I am one of the whole bunch of freshers who have started their careers in this pandemic situation. There was a lack of interaction since I was not physically present in the company. But luckily, I have got the coolest Sunbaes who to be honest did not help me that much at first, haha just kidding 😛!!

Obviously, it was awkward in the beginning, but after a few days, I could see myself adapting well to the atmosphere. As I was on my way settling with all the onboarding stuff, one fine day my senior gave me a task. Ya, it was to study and work with the hero of this blog, the Mirth Connect.
I can see the question popping out of everyone’s head “Sunbae nah yenna pa?”, “What is Sunbae??”. It is just the Korean word for ‘Senior’.
So firstly, what is Mirth Connect? Mirth Connect to be exact acts as that platform to transfer or share Healthcare Data with high levels of security and ease. The Health Level 7, an International Organization came up with the standard called the Health Level 7 (HL7) for easy and safe sharing of healthcare data because it appears as only a cluster of alphanumeric data with a bunch of special characters for non-tech people.
The Mirth Connect is an Open Source Healthcare Interface/ Integration Engine which provides a solution for the interoperability problems between two systems or two applications. The interoperability issue is important to be solved because internal communication of the systems (applications) is required (i.e.) the sharing of the medical data is required.
“What is Interoperability: it is the ability of two computer systems that can effectively communicate and use the information that is being shared.”
The Interface Engine acts as a communicating bridge between any two software applications where the data is sent from the source and received at the destination. Mirth Connect Interface Engine provides Bidirectional Communication which is an added advantage. There are many other Interface Engines available but Mirth Connect takes the place as the most commonly used
The applications where the data is shared from and to can be the Health Information Systems (HIS) where the Electronic Health Recorder (EHR) data is collected and stored (basically the database) in a hospital, clinic, or other healthcare centers or from data providers, etc. The data is shared through the Mirth Connect platform. Since Mirth Connect provides bidirectional communication, the source and destinations can be reversed.
What version of Mirth Connect did I use? I used the NextGen Mirth Connect 3.9.0 released on 16th April 2020 developed by Caduceus Healthcare Inc. which provides Medical, IT, Scientific, and Administrative Services.
Where can I download NextGen Mirth Connect from? How do I install it? What are the features of it? https://www.nextgen.com/-/media/files/nextgen-connect/nextgen-connect-39-user-guide.pdf
FEATURES
The important thing about Mirth Connect is that it communicates through Channels that are created by the users. These channels can be customized accordingly; the customization available in Mirth Connect are:
- You can choose the type of Source and Destination
- One or more Destinations can be created and the data can be sent simultaneously
- You can send and receive the same data as it is or Transformers and Editors can be used to transform the original data.
- You can create your own template as in how the data must be sent from the source and the destination
and many more…
MIRTH CONNECT- INTERFACE (DASHBOARD):
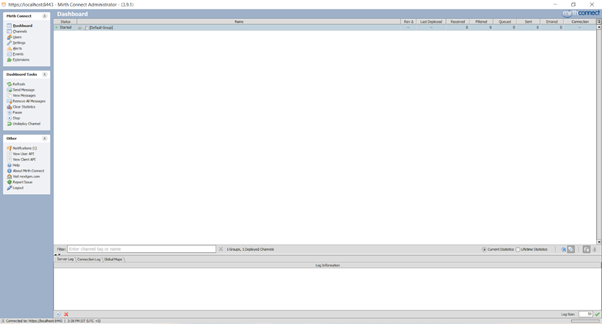
Where the Channels are created, the Status of the Deployed channels, Idle channels, Errors, Tasks, etc. will be seen.
SOURCE:
The source is where the raw data is extracted or taken from a File, a Web Portal (a URL), etc. The data can be of any format and it can be changed according to the requirement of the User. Sources in the Mirth Connect are called the Connector Type, from where the type of source can be selected. Few of the Source Connector Types are,
- TCP Listener
- File Reader
- HTTP Listener
- Database Reader etc.
DESTINATION:
The place where the extracted data is sent to in Mirth Connect is the Destination. The data reaching the destination can be in the same format as the source or it can be transformed into some other format (according to the requirement); it also contains the Destination Connector Types as in from where the channel has to fetch the data which is being sent from the source:
- TCP Sender
- File Writer
- HTTP Sender
- Database Writer etc.
TRANSFORMERS:
Transformers in Mirth Connect are required to change the format of the Incoming Messages (from source) or the Outgoing Messages (to destination). One can edit either the Transformer of the Source or of the Destination. One can customize the channel to see the Raw data as well as the Transformed Data in the destination as well as the source.
Work done by Me
I used Mirth Connect to create a channel and customized it accordingly,
- To obtain a HL7 Message (source data) from the TCP Listener connector type in the Source section. The HL7 Soup Software Version 3.0.0 (a HL7 Message Viewer, Editor and Analyser Software) was used as the message provider.
- To receive the message from the source and put it in the destination. Two destinations were created,
- The first destination (Destination 1) was a File Writer connector type where the data from the source gets transformed and gets stored in a Text Document. The path for the document was mentioned in the destination settings.
- The second destination was a HTTP Sender connector type configured in the GET method as in to get the data (transformed data) which is being sent from the source.
- A Transformer in the destination side to transform the input HL7 message into a JSON formatted message (HL7 to JSON).
- The final output is the response and status of both the source and destination 2 as it is shown in the below screenshots
HL7 Soup Software– Acknowledgement Message sent from the Mirth Connect Source:

Source- Acknowledgement, and Response:

The response of the Source is the “ACK successfully generated” and the status is SENT (i.e.) the acknowledgment was generated and sent to the HL7 Soup Software, which is the message provider for the TCP Listener.
Destination- Response:

The response from Destination 2 (i.e.) the HTTP Sender is SENT as it implies that the HL7 message was successfully sent to the HTTP server used.
To start with, HL7 and Mirth Connect are not that difficult to learn and use. There are many tutorials and blogs across the internet that help a very beginner to know about the topics. For me, who never have heard these names before it was quite tedious to understand at the first, but later on, I realized that it was not a big deal to learn and put it into practice.
What I have learned being an Intern in Spritle is,
The output screenshots that you can see were not obtained in the first go. Yes, I made very silly mistakes, got irritated, and even thought of giving up because this was a completely new domain. But one of my Sunbae shared his story about how he made a simple spelling mistake and was sitting with that error for the whole day. After listening to that, I thought why don’t I give it a try, and here I am.
Though this is a very small part of all the great works others are doing, this means a lot to me. This is how I struggled alone in the beginning but with the help of others, I was able to complete the task. I wish Spritle continues to encourage newbies like me and pull us forward in doing better things. Thank you and Happy Learning!!!
Few other links you can refer to,
https://datica.com/academy/hl7-201-the-admission-discharge-transfer-adt-message
https://nilkamaldp.wordpress.com/
We have developed a one click install on the AWS Marketplace:
https://aws.amazon.com/marketplace/pp/prodview-vo45llphgd5so?sr=0-1&ref_=beagle&applicationId=AWSMPContessa