
Hello folks, in mobile app development, developing a mobile app that communicates with the device hardware like a Camera, Bluetooth, Microphone, and so on sounds all strange and exciting right?
Yeah! Recently, I worked on a project with my team that involved the challenge of connecting our mobile app with a BLE weighing device and communicating with it to get weight values. So, how did we succeed in this, and what were the installations, steps, and challenges we went through? Let’s explore these in this blog post about React native expo app – Gateway to connect & communicate with BLE devices.
For developing the mobile application, we leveraged the React Native framework with the Expo SDK without ejecting. That said, let’s first define BLE and get into the installation and step-by-step process we followed to complete this project.
Bluetooth Low Energy (BLE)
BLE stands for Bluetooth Low Energy, and as the name indicates, it uses low power to communicate with other BLE devices compared to Classic Bluetooth. Bluetooth Low Energy got released in 2011 and referred to as Bluetooth Smart and Bluetooth 4.0; it is designed to offer many of the same features as Bluetooth but focuses on low power. As a result, it’s not quick and the best choice for transferring large files. But, for small amounts of data transfer, it’s a worthy option as it takes minimal power consumption.
That said, BLE makes it possible for a wide range of tiny IoT devices, such as sensors and tags, to communicate despite not having large batteries. Some examples of BLE devices are heart rate sensors, body weight scales, thermometers, proximity tags, etc.,
Now, let’s dive into the initial steps of installation and configurations we made for making our mobile app ready for communicating with the BLE device.
We have developed the Expo-managed workflow mobile application and have implemented Bluetooth operation with the help of the Expo config plugin for react-native-ble-plx package and Expo Application Service (EAS).
Installation and Configuration:
We used the npm package “react-native-ble-plx”. By using this package in the Expo app, we must additionally install the config plugin also.
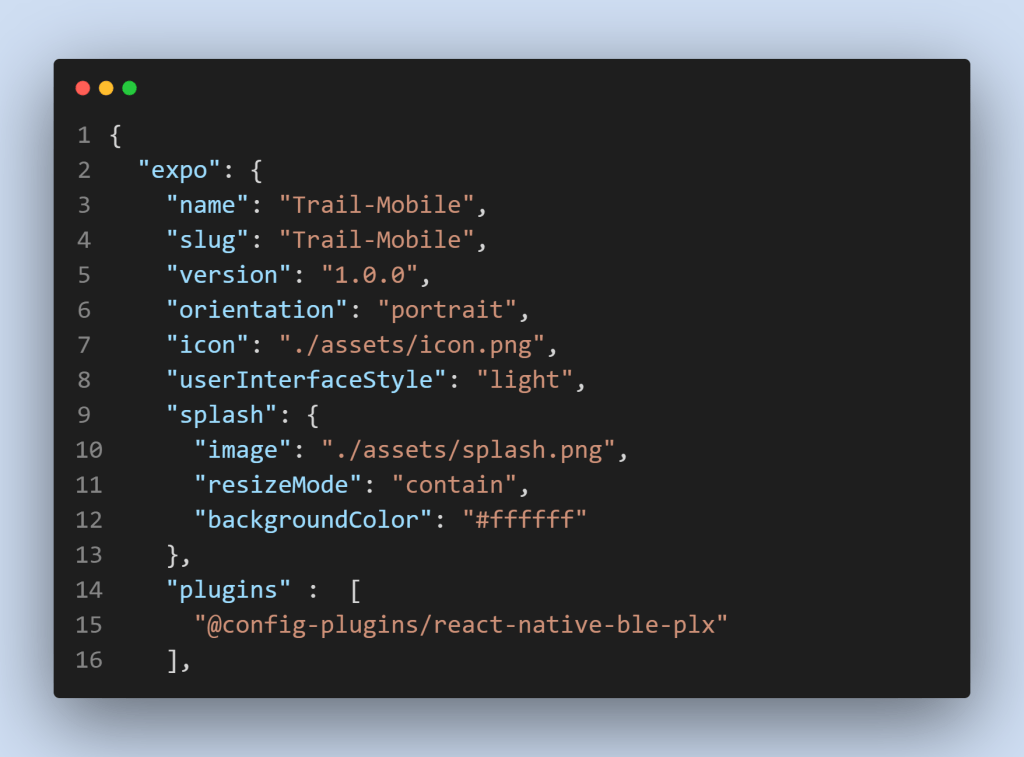
Installation Command: npx expo install react-native-ble-plx @config-plugins/react-native-ble-plxAfter installation of this npm package, we added the config plugin to the plugins array of our “app.json” or “app.config.js”. We have included it in the plugin’s array in the “app.json” file and below is a snapshot of this for your reference.
One thing we have to remember here is, this package cannot be used in the “Expo Go” app as it requires custom native code. Now, for using this package for app development, we have to use a Development Build or a Pre Build. So, what is a Development Build and how should we create one? Let me elaborate on this here!
Development Build:
One way of creating Development Build is to use EAS Build or locally create it on your computer. For making EAS build, we need to configure it with the EAS build service. If you have already configured it, in that case, skip the steps given below.
Follow the link below to learn more about EAS Build configuration: https://docs.expo.dev/build/setup/
Steps for Configuration of EAS build with its service:
Step 1: Install the EAS CLI
Installation command: npm install -g eas-cliStep 2: Login by Expo or EAS account
If you already have an expo account and logged in to that account by CLI or have an EAS account logged In by CLI, skip these below steps. But ensure you are already logged in by running the “expo whoami” or “EAS whoami” command.
If that command doesn’t work, run the “Expo login” or “EAS login” command in CLI to log in with your account credential. After logging in, check if expo means “expo whoami” command or “eas whoami” command.
Step 3: Configure the project with EAS build
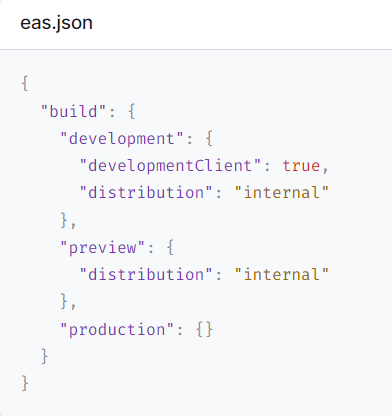
Configure command: eas build:configureRun the above command in the root folder to configure your project with the EAS build service. After running this command, it will create the “eas.json” file and stores it in our app root folder. In that file, three build profiles (development, preview, and production) are present.
Ensure the property in the “eas.json” file, “developmentClient ”: true, and “distribution”: “internal” in the development build profile. If it’s not included, add it to the build profile. Now, this is a crucial step as it activates the development build to function.
The “eas.json” file looks like the below screenshot.
Step 4: Install the expo-dev-client package:
For making development builds, we need to install the expo-dev-client library.
Installation command: npx expo install expo-dev-clientFor more reference, please check the below link
https://docs.expo.dev/development/introduction/
Step 5: Make development build:
Build command: eas build --profile development --platform androidRun the above command to build the app. It takes some time. After completing the build, it gives the installation link. By using that link install the app directly on the device.
Step 6: Start Development Server:
Now, finally, for starting the development server, the following command is run to start the development server:
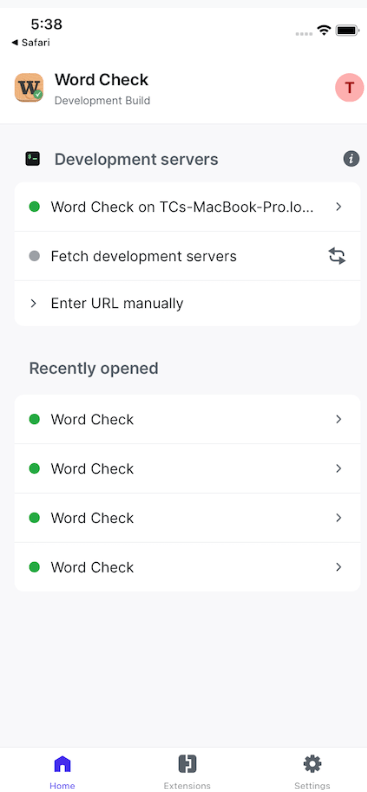
Start development server command: npx expo start --dev-clientAfter running this command, it generates a QR code. You can use the QR code or open the development build, to start developing your app. The development build will look something similar to the below screenshot.
Note: Make sure that you use the same network for both the development environment and the Mobile device
What if a bundler gets detected on your local network or you’ve signed in to an Expo account in both Expo CLI and your development build?
In that case, you can directly connect from this screen or scan the QR code displayed by the Expo CLI.
These are the steps used to develop the native code app in Expo by using a development build. As mentioned earlier, Prebuild is also a good choice for creating Native Code App for Expo. The steps are as follows:
Steps while using Prebuild:
If we don’t want to make development builds, we can locally build the app using Prebuild. For more reference, please check the link below. https://docs.expo.dev/workflow/prebuild/
Prebuild command: npx expo prebuildThis command creates the Android and iOS directories for running your React code. If you don’t want both platform directories, then, go for the platform-specific pre-build command. And, if you prefer to include the platform in the pre-build command.
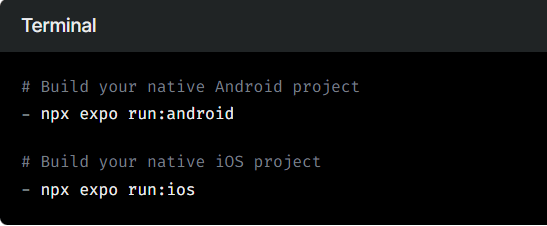
Platform Specific Prebuild command: npx expo prebuild --platform iosAfter Prebuild, we can run the app on a device(connected to USB) by using the below-shared screenshot commands.
Initialize and Implementation:

Import BleManager and initialize the file.
Now, having seen the Development Build and Prebuild, let’s look into how to perform Bluetooth operations. To perform Bluetooth operations like scanning, connecting, and receiving data, we should consider three important things.
1. Pair Bluetooth device
2. Permission
3. Bluetooth Adapter state
Now, let’s look into these three topics below.
1. Pair Bluetooth device:
We need to pair the Bluetooth device manually in Bluetooth settings because we will need a paired device for using the “react-native-ble-plx” package in our app.
2. Permissions:
Accessing the device Bluetooth needs some specific permissions. These permissions differ for different Android versions. We can use the “expo-device” library to find the Android version to perform the appropriate permissions for the appropriate Android version. The permissions mentioned below are runtime permissions. We need to request the user and get “Allow” access before performing the Bluetooth operations.
Installation:
Command: npx expo install expo-deviceUsage:
import * as Device from "expo-device";For more reference please check the below link of the “expo-device” library
https://docs.expo.dev/versions/latest/sdk/device/
Permission Settings for Various Versions of Android
Android Version 12 or Greater:
There are BLUETOOTH_SCAN, BLUETOOTH_CONNECT, ACCESS_FINE_LOCATION. These are required permission for version 12 or greater.
Android Version 11 or Lower:
BLUETOOTH and ACCESS_FINE_LOCATION are necessary for version 11 or lower, BLUETOOTH is not dangerous permission so don’t need to request this permission in runtime, But we need to request the ACCESS_FINE_LOCATION permission for the user to get “Allow” access. and also make sure “Location” is ON in Mobile. Otherwise, we couldn’t perform the Bluetooth operations. This is necessary for version 11 or lower.
After getting the “Allow” access, we can access the device’s Bluetooth to scan, connect and do all the Bluetooth actions. Since I have been working on an Expo project, there was no expo API to request this kind of permission. So, I used the Build-in React Native “PermissionsAndroid” API to make the mentioned permission request. I have shared the code snippet for making the required BLE operation permission for Android below. kindly refer to it.
For more information about Bluetooth permissions on Android, please check the official Android developer site shared below.
https://developer.android.com/guide/topics/connectivity/bluetooth/permissions#:~:text=If%20your%20app%20supports%20a,Access%20location%20in%20the%20background.
3. Check the Bluetooth adapter state:
| State | Description |
| PoweredOn | Bluetooth is currently powered on and available to use |
| PoweredOff | Bluetooth is currently powered off. |
| Unauthorized | The app is not authorized to use Bluetooth low energy. |
| Unsupported | The platform does not support Bluetooth low energy |
| Resetting | The connection with the system service was momentarily lost; an update is imminent. |
| Unknown | The current state of the manager is unknown; an update is imminent. |
Interacting with BLE devices needs specific conditions under which it is possible. Therefore, to find out what is the current state of the Bluetooth Adapter state, two functions are available.
1. state() Method:
Syntax:
bleManager.state(): Promise<$Keys> It returns the promise which resolves the current state of the Bluetooth. All APIs are working only when the active state is ‘PoweredOn.’
2. onStateChange() Listener Method:
Syntax:
bleManager.onStateChange(
listener : (newState : $Keys)=> void,
emitCurrentStatus : boolean = true
): subscription
In this method, the listener registered will be notified about state changes of a BleManager. When observing is not needed, one must call “subscription.remove()” to unsubscribe.
In our project, we implemented the state change listener because Bluetooth is required to perform all operations. So, I used a listener to check if Bluetooth is “ON”, ON means to make the Bluetooth operation otherwise indicating Turn on Bluetooth message in the appropriate Bluetooth operations making screen.
I created the Custom Hook for Bluetooth adapted state because we can only perform all Bluetooth operations If the Bluetooth adapter is “PoweredOn”. So before performing the operation, we should check the adapter state. That’s why I created the custom hook. whenever we needed we use it. I have shared the code snippet below, Kindly refer to the below snippet of the custom hook for Bluetooth Adapter state listener
Usage of a Bluetooth Adapter state listener custom hook:
In the below code snippet, “access permission” is a State used to check if the permissions are granted or not. If you have further queries, please check the Permission code snippet above.
Scanning of devices:
1. startDeviceScan() Method:
Syntax:
bleManager.startDeviceScan(
  UUIDs: ?Array,
  options: ?ScanOptions,
  listener: (error: ?Error, scannedDevice: ?Device) => void
)
startDeviceScan() method is used to scan the nearby BLE devices, In this method, we can set three parameters mentioned above in the code syntax. I described below each parameter. If you need further clarification, follow the reference link below. please check the below:
https://github.com/dotintent/react-native-ble-plx/wiki/Bluetooth-Scanning
Three parameters in StartDeviceScan() method:
1. UUIDs
The abbreviation of UUIds is a Universal Unique Id. It is a unique number used to identify services, characteristics, and descriptors, also known as attributes. These IDs are transmitted over the air, so that, (e.g.). a peripheral can inform a central what services it provides. So, what is a peripheral and central? Let’s explore.
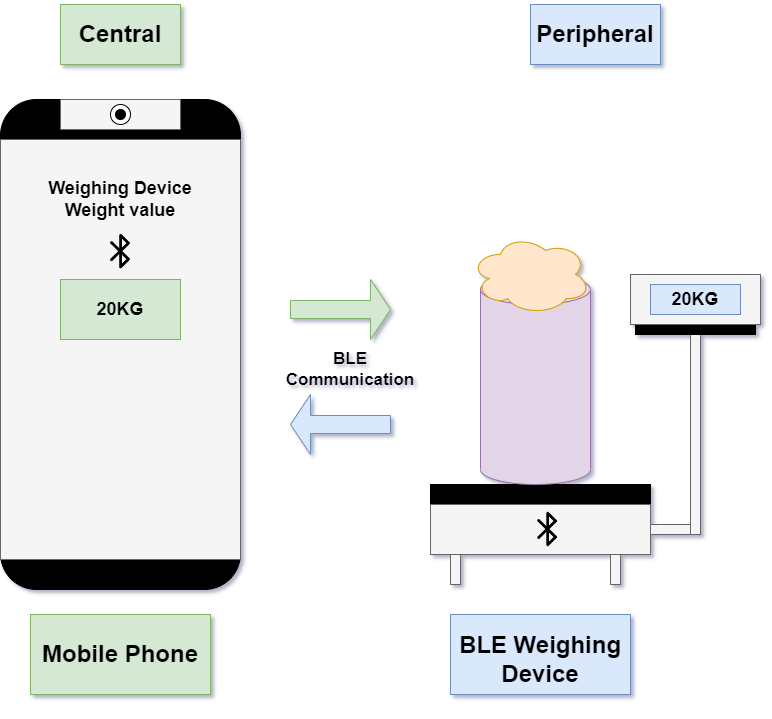
Central – It is the BLE device that initiates an outgoing connection request to an advertising peripheral device.
Peripheral – It is the BLE device that accepts an incoming connection request after advertising.
In my case, the Mobile phone is the Central and the Peripheral is the Bluetooth weighing machine. Peripheral advertises Central gets the information of advertising peripheral devices, and a peripheral ID is used to request a connection.
In the UUId’s parameter – we can provide the array of UUIds to only scan the particular UUId devices. If we set null, it scans all available BLE devices nearby the Central device.
2. ScanOptions
Optional configuration for scanning operation.
allowDuplicates?: boolean – duplicate scanning records are received more frequently [iOS only—default false]. On Android, The duplicates will be emitted.
3. Listener function
In the third parameter, we need to define the function that calls every time when the device is scanned (devices may be scanned multiple times).
This function accepts two parameters. Those two parameters are
1st parameter that holds the error information if there is any error when scanning. The 2nd parameter holds the scanned device information.
Stop Device Scanning:
1. stopDeviceScan() Method:
Syntax:
bleManager.stopDeviceScan()stopDeviceScan() method is used to stop the scanning. In our project, we scanned the device in 2 seconds(using setTimeout()). After 2 seconds, we used the stopDeviceScan() method to stop the scanning.
I have shared the code snippet below, Kindly refer to it.
Connect a Paired device:
As discussed above, we can connect the paired device. To connect a device, one needs to first scan it. When a Device is scanned, It is possible to establish a connection by calling the “connectToDevice()” Method. For more reference please check the below link.
https://github.com/dotintent/react-native-ble-plx/wiki/Device-Connecting
1. connectToDevice() Method:
Syntax:
bleManager.connectToDevice(
    deviceIdentifier: DeviceId,
    options: ?ConnectionOptions,
): Promise
This method resolves by a promise once a connection is done.
Parameters:
1. deviceIdentifier
We need to pass the deviceId, the deviceId here is the one we got from the scanned device. So which device we want to connect indicates, calling the connectToDevice() method by passing its deviceId.
2. options
We can pass the connection-specific options to be passed before the connection happens. There are
1. autoConnect?: boolean—Whether to directly connect to the remote device (false) or to automatically connect as soon as the remote device becomes available (true). [Android only].
2. requestMTU?: number—Whether MTU size will be negotiated to this value. It is not guaranteed to get it after the connection is successful. iOS by default tries to negotiate MTU up to 187 bytes.
Device Disconnection:
Disconnect Listener:
After the successful connection with the device, we can check the device disconnection by using the “onDisconnected()” Method. It has the listener function, It will trigger when the connection is disconnected.
Syntax:
device.onDisconnected(listener:(error,device) => void):SubscriptionIn this method, it returns the Subscription, so that we can store it in a variable and unsubscribe the listener if no longer needed eg: unmount the component, etc.,
Parameter:
1. Listener function has two parameters, 1st parameter holds the error information if any error occurs. 2nd parameter holds the connected device data.
Cancel the connection of the connected device:
If the Bluetooth connection is no longer needed, in that case, the following methods could be used to disconnect the connection:
1. cancelConnection() Method:
Syntax:
device.cancelConnection(): Promisedevice.cancelConnection() method is to disconnect the connection of connected devices. By using this method in the connected device object, we disconnect the connected device.
It resolves the promise when the connection is disconnected.
2. cancelDeviceConnection() Method:
Syntax:
bleManager.cancelDeviceConnection(deviceIdentifier: DeviceId): PromisebleManager.cancelDeviceConnection() method is also used to disconnect the Bluetooth connection with the connected device. This method uses deviceId and resolves the promise of when the connection is disconnected.
Getting the Weight Value From the BLE Weighing Machine:
After we established a connection with the device, we weren’t able to directly get the data from the BLE device. And some of the fundamentals we needed are as follows:
Let’s assume Client and Server. Initially, the client doesn’t know what the data server will serve. When the client knows, it means, he will make a request to the server and it knows. We had a similar scenario in our case.
Our case in detail
In our case, the client denoted the Central(Mobile device), and the Server was a peripheral(BLE Weighing Device).
So, every BLE device has some services like data in the server.
Each service supports some characteristics like Read, Write, Notify, etc.,
So, first we need to discover what services and characteristics the BLE device will provide. Some of the methods to find this are,
1. discoverAllServicesAndCharacteristics() Method:
Syntax:
device.discoverAllServicesAndCharacteristics(): PromiseInitially, we use the discoverAllServiceAndCharacteristics() method to discover the service and characteristics. It resolves the promise of the device. And Followed by this step, We use the services() method to get services. For more reference please check the below link
https://github.com/dotintent/react-native-ble-plx/wiki/Device-Service-Discovery
2. services() Method:
Syntax:
device.services(): Promiseservices() method is for getting the services of the BLE device. This method resolves the Promise array of services.

We got 3 services from the BLE Weighing device.
After getting services, As discussed earlier, each service has some characteristics. So, we need to get these characteristics for a particular service.
By using,
1. characteristicsForService() Method:
Syntax:
device.characteristicsForService(serviceUUID : UUID) : Promise It resolves the promise of characteristics. Each characteristic supports some operations. We have shared the image log of the characteristics of each service that we got from services of BLE Weighing devices.
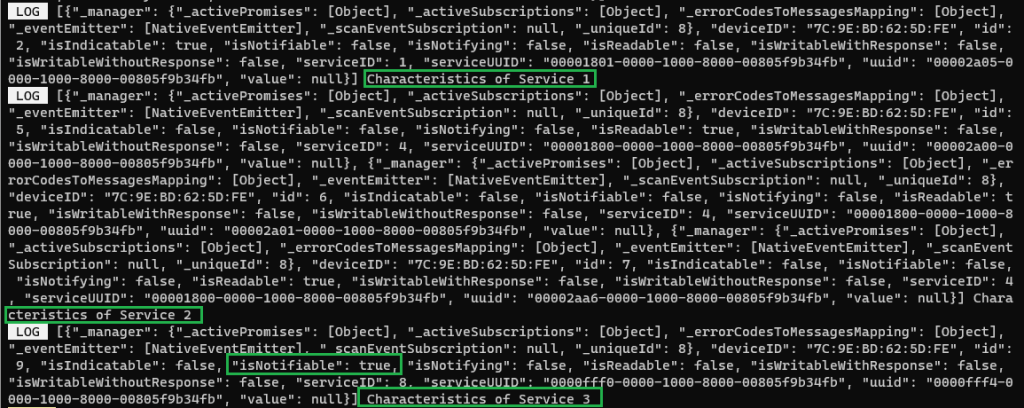
In our use case, we don’t want to make any read or write operations. We need only the displayed weight value of the BLE weighing device. We can make this use case in Notify property of characteristics.
Notify – This property enables the server(peripheral) to send data to the client(Mobile phone) at any time it wishes to. It is also known as server-initiated data transfer. No response (acknowledgment) is sent by the client.
So, we need to find out the ‘isNotifiable’ true property in characteristics.
Is it true? means we monitor those characteristics to get the BLE weighing device displaying weight value.
1. monitorCharacteristicForService() Method:
Syntax:
device.monitorCharacteristicForService(
    serviceUUID: UUID,
    characteristicUUID: UUID,
    listener: (error: ?Error, characteristic: ?Characteristic) => void,
    transactionId: ?TransactionId
): Subscription
This method monitors particular characteristics. This method returns the “Subscription.”We can store this subscription in a variable and use it to unsubscribe(like stops the listener function) from the monitorization.
(E.g.) we can stop the monitorization when the page unmounts or we want to stop the process.
For more reference please check the below link.
https://github.com/dotintent/react-native-ble-plx/wiki/Characteristic-Notifying
Parameters:
1.ServiceUUID: The UUID of the service that contains the characteristic of “isNotifiable” true property
2. characteristicUUID: The UUID of the characteristic property “isNotifiable” true
3. listener: (error: ?Error, characteristic: ?Characteristic) => void – the listener for characteristic value changes. Will receive either error or characteristic with updated value but not both.
4. transactionId: TransactionId—optional, TransactionId which can be used in bleManager.cancelTransaction() function.
By using the listener function, we get the weight value. The second parameter “characteristic” in the listener function has a “value” property, In that property has the value of the BLE Weighing device displaying weight value. But the value from the Weighing device is base64 format we can convert into the human-readable format by using any third-party library. I used the “react-native-base64” package to convert base64 to a normal readable format. I shared the code snippet below for getting the weight value from the BLE weighing device, Kindly refer to it.
Conclusion:
We hope, in this blog, you found some useful insights on React native expo app on how to connect the BLE devices like the one discussed in this blog to the application you are developing. Thank you, readers! Keep learning and sharing your knowledge with others by writing blogs or anything your preferred way. See you in the next blog with another interesting topic. Bye Bye !!!!!