
Hi everyone, I hope you all are safe and doing well!
This is my first blog, there should always be a perfect reason to start doing something new right? Yeah it’s true in my case as well, :)) !!!
The aim of the blog is simple, that I want to clearly mention the steps in ML model dataset preparation so that no one will repeat the same mistakes that we did and I also wanted to make the steps clear for everyone. I hope this blog will fulfill its aim and also be useful !!!

Steps in ML model datasets:
- Data collection
- Data analysis
- Data Extraction
- Annotations
- Preparing datasets for Training
- Training
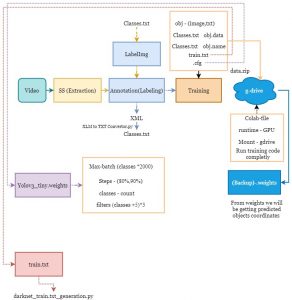
Data Collection:
Data Collection is the initial process and much-needed process in the ML model dataset preparation. “Data is the key to unlock the future”
This critical and tough job is perfectly carried out by our great management team! Collected data will be usually in mp4 (video) format.
Data analysis:
Now to our analytics team raw data and the list of features to be monitored are given. Then our analytics team will closely analyze the data and try to find the unusual pattern and finalize the features and classes name.
Data extraction:
After finalizing the features and classes.txt next step is data extraction. In this step, we convert the video data into a useful image format based on the analyzed data.
Annotations:
After extracting the required data the next step is annotations. For annotations (labelling the image) we use 3rd part tools “Labelimg” or “LabelMe”. A common error in annotations is using the wrong classes.txt file.
![]()
Installation of Labelimg:
Windows
Requirements:
- Python
- PyQt5 (pip install PyQt5)
- Lxml (pip install lxml)
- Labelimg (pip install labelImg)
- To open labelimg open cmd and type (labelImg [IMAGE_PATH] [PRE-DEFINED CLASS FILE])
Ubuntu
Requirements:
- Python
- PyQt5 (sudo apt-get install pyqt5-dev-tools)
- sudo pip3 install -r requirements/requirements-linux-python3.txt
- make qt5py3
- python3 labelImg.py
- To open labelimg -> python3 labelImg.py [IMAGE_PATH] [PRE-DEFINED CLASS FILE]
Once the annotations are completed the next step is converting the Yolo (size dependent) file into a pascal VOC (Size independent but image ratio-dependent format).
Preparing data set:
For training we needed to prepare a dataset (data.zip folder and upload it to g-drive for training) We are using google collaborator GPU for faster training.
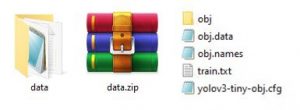
Data folder:
- obj
- obj.data
- obj.names
- train.txt
- Yolov3-tiny-obj.cfg
obj:
This folder should contain resized images (resized images for faster training and better data handling in g-drive) and the image respective pascal VOC file.
obj.data:
This file contains the classes count and specific path to train.txt file, obj.name, and the path to store the output result weights file (other than classes count all the data are predefined)
obj.name:
This file should contain the pre-defined features name that we defined in step 2 (data analysis) as classes.txt file
train.txt:
This file will contain the predefined path of where the image is present in the data.zip file (data/obj/) along with the image’s name. The biggest mistake is not properly generating the train.txt file. It is very important to verify that the image count and the total lines in the train.txt file are the same if not then we needed to regenerate the train.txt file
yolov3-tiny-obj.cfg:
This is the very impotent file that defines the number of classes, max iteration (batches) and filters count. Most of the part in the cfg file is constant even though we needed to make changes in four areas they are:
1. max_batches count which should be (classes count * 2000)
Eg: if classes count is 2 the max_batches = 4000
2. steps are 80% and 90% of the max_batch value
Eg : mab_batches = 4000 steps=3200,3600
3. classes count at the end in two area
4. filters near classes count which is calculated based on the formula ((classes count + 5) *3)
Eg: classes count is 2 ((2+5) *3) therefore filters=21
After clearly verifying all the data are correctly filled then data folder (which contain all the 5 require content) is zipped. data.zip is finally ready for training.
Training:
As I already mentioned we are using g-drive along with google Collaboratory GPU to train the custom data set. First step is to upload the data.zip file to g-drive then we needed to use the predefined ipynb file to train the model. Before starting the training, it is very important to change the runtime of Collaboratory to GPU.

In the ipynb file once the darknet is installed then we need to wait for the same to be replicated in g-drive, usually it will take 2 to 8 min based on the size of the dataset we are going to train. Once the darknet folder is generated then we needed to go to “darknet->build->darknet->x64” and then delete the data folder. Come back to the darknet folder and find the unzipped data folder and move it to “darknet->build->darknet->x64 ” this path and then move the yolov3-tiny-obj.cfg which is inside the data folder into “darknet->build->darknet->x64” this path.
Above mentioned file movement to certain path inside darknet folder is mandatory as it is a part of a written documentary of darknet training. For more information regarding this you can refere this github page “https://pjreddie.com/darknet/yolo/”. After file movement, we can run the remaining code in the ipynb file.
After running the training command “!./darknet detector train data/obj.data yolov3-tiny-obj.cfg -dont_show” We needed to closely watch for any error message like the image can’t be loaded or the file is missing then we needed to check the image name mentioned in the error message and make the changes accordingly in the train.txt file or in the dataset.
If training is interrupted somewhere then we can continue the training based on the last weights stored inside the backup folder in the “darknet->build->darknet->x64->backup” mentioned path.
Once the training is completed all the weights file are stored in “darknet->build->darknet->x64->backup” in this path. Now traing is completed.
Errors we may face:
Data extraction: Video timing bar may present in the extracted data
Annotations: Using old classes file, adding a new feature name accidentally, and annotating wrongly.
Yolo to Pascal VOC: Using old classes.txt file
Preparing datasets for Training : Missing train.txt, obj.data, obj.names and yolov3-tiny-obj.cfg generation or not updating.
Training: Need to wait for the data and darknet folder to get generated in the respective path after generating it through colab.
References:
https://pjreddie.com/darknet/yolo/
https://pypi.org/project/labelImg/
https://github.com/AlexeyAB/darknet
This is my first blog !! If anyone find any errors or improvements to be made, or any questions please feel free to comment it out below!
Have a nice upcoming days!