
Challenges with React native app development is growing day by day. We are always ready to accept those challenges and make our development process enjoyable.
This time we came up with an experiment to build simple mobile application that allow user to live stream their mobile camera using OpenTok and React Native.
This blog contains useful steps that you can perform in order to integrate openTok with React Native. Okay! Let’s dive in.
OpenTok
“Real-time, high-quality interactive video, voice, messaging, and screen sharing for web and mobile apps”
OpenTok is video platform tool from TokBox community to easily integrate high-quality video,audio streaming with your web or mobile apps.
OpenTok uses WebRTC technology for audio,video communications. OpenTok supports web,iOS,android and windows apps.
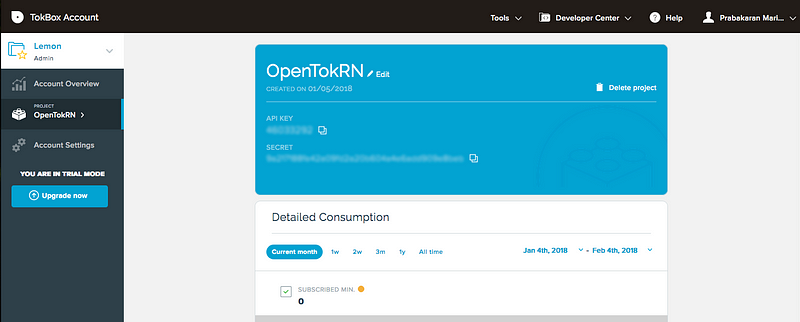
Setting up OpenTok Account
Once you ready with your OpenTok account registration process, you can create a new project for your react native mobile app.
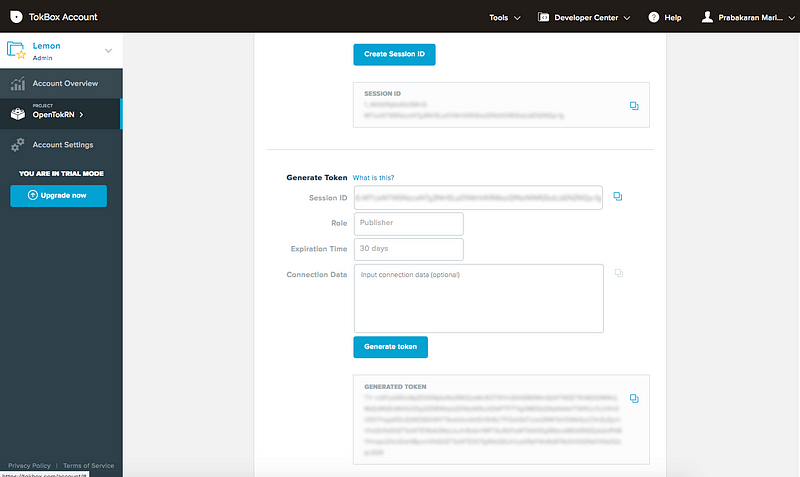
We can create a test session and tokens for the project from the Opentok dashboard. With this session id and tokens, we can easily initiate live streaming.
All is set. Before starting to stream using camera, it is good to know about openTok Basics.
- Session: OpenTok video streaming are initiated by session. These sessions are hosted on the OpenTok cloud. Every session is associated with its own unique Session ID. With the help of this Session ID,we can allow multiple clients to be connected with specified session streaming.
- Publish: When client device is connected with session, it can publish an audio-video stream to the session. Using Publisher token, we can allow the client device publish to the session. This allows for sessions with only one or two publishers but many subscribers (one-to-many).
- Subscribe: Once a client device is connected to a session, it can subscribe to any audio-video streams published by other clients in the session. This action accomplished by Subscriber token.
If you would like to learn more about openTok basics , refer OpenTok official developer documentation
Integrating with React Native
OpenTok platform provides for SDK for various clients like Android, iOS and Windows. There is no official client SDK for React native apps.
The CallStack community developed an open-source react-native wrapper for OpenTok called react-native-opentok. This is one of the best wrapper for OpenTok.
Let’s see the steps required to integrate an OpenTok session within React Native app for both Android and iOS
Installation of react-native-opentok
This 'react-native-opentok' plugin is build by integrating native open-tok SDK’s with Javascript. So you can install this by using npm or yarn like below
yarn add react-native-opentok
iOS
Using CocoaPods, we can easily integrate react-native-opentok plugin with our react native application.
Here I’ll be adding the ‘RNOpenTok’ pod. My Podfile looks like so:
In order to access the camera and microphone for streaming, iOS 10 requires you to set values for the NSCameraUsageDescription and NSMicrophoneUsageDescription keys in the Info.plist file . Don’t forgot add your OPENTOK_API_KEY to your property list.
Android
For android, we can automatically link the react-native-opentok with project using link command below,
react-native link react-native-opentok
Also add opentok maven repo to your android/build.gradle and update it.
allprojects {
    repositories {
        ...
        maven { url "http://tokbox.bintray.com/maven"}
    }
}
Configure your manifest file with OPENTOK_API_KEYand follwing permissions.
....
Building mobile app
It is a basic application that gives a simple way to explore with the OpenTok SDK. This demo app provides most of the core functionality like,
- Connecting to an session
- Publishing audio-video streams to a session
- Subscribing to audio-video streams in a session
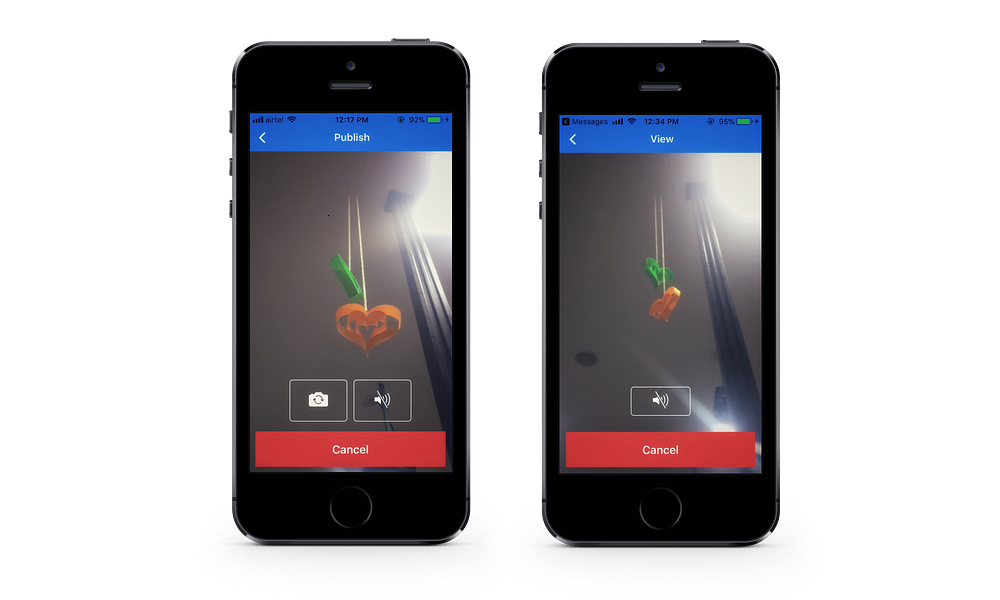
Our demo app contains two main components like Publisher and Subscriber component. So user can publish by initiating session and another user with same session id and subscriber id can join to session to watch live video streaming.
When you connect to an OpenTok session in an app, you specify the session you want to connect to using an OpenTok session ID also Publisher/Subscriber ID to perform publish/view actions.
Publisher Component
Publisher component is used to live stream the camera from client’s device on real-time.
Here is the publisher component for the specific session,
In above Publisher component, we have used following methods and properties.
- connect( sessionId:string, token:string ): This method is used to user’s connect with specified session using session id and publisher token.
- disconnect( sessionId ) : This method disconnects the client’s user from session by using sessionId.
- mute: This props is used to allow user to publish audio as well as. By default it is false.
- onPublishStart() : This method invoked when publishing action starts.
- onPublishStop() : This method invoked when publishing action stopped.
- onPublishError() : This method invoked whenever error occurs while publishing.
Viewer Component
Subscriber component is allow user to join with specified live stream using Session id and Subscriber token like below,
Footnote
So the result, we ended up with simple cross-platform mobile app that perform live streaming.
Using this app user can connect with a session to publish their stream also subscriber to the stream.
Our final outcome will be like below,
I hope you enjoyed the reading and learned something in the way. Thank you!
Check out my Github repo for the full codebase for this demo app.
I got the connect undefined in component will mount, I have done as u have described above.
Can you please provide some more information about the issue that you are facing and platform( Android iOS)? So that I can help you.
Thanks now working on android amd IOS.
I want to create multi broadcasting and need connecton_id but constant ON_SESSION_CONNECTION_CREATED not working for me. Only ON_SESSION_DID_CONNECT working for me. If you know the solution plz help me.
Thank you advance.
Also thanku for this post.
Thanks for the great article.
Do you know how to create sessions from this react-native-opentok?
If it is not possible, do we need to call RESTFul API to create sessions?