
As we know to run a react-native project we need to listen to the server, but can we do it like normal app , can we run the app without listening to the development server ? The answer is yes , it can be achieved through bundling your js files , lets see how it can be achieved.
To do that go to your projects directory, start the development server, enter the following command and press enter
[source=’bash’]
$sudo npm run start
[/source]
Now you have started your development server, now we should create the js bundle for that enter the following command and press enter
FOR IOS
[source=’bash’]
$curl http://localhost:8081/index.ios.bundle -o main.jsbundle
[/source]
FOR ANDROID
For android download the bundle using following command.
[source=’bash’]
$curl “http://localhost:8081/index.android.bundle?platform=android” -o “android/app/src/main/assets/index.android.bundle”
[/source]
we have created the js bundle now , now we have to add it to our code and change the code location in our AppDelegate.m file so lets do that .
FOR IOS
open your project in Xcode by entering the following command
[source=’bash’]
$open iOS/[yourproject].xcodeproj
[/source]
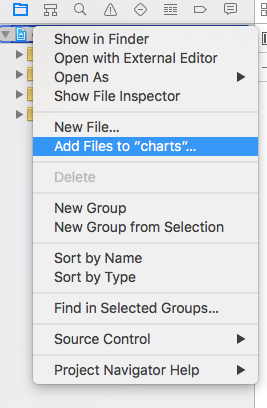
after that you need to add the main.jsbundle into the your project in Xcode for that go to side menu in and right click and select Add Files to “your project” then add the main.jsbundle file to it like this

After that we should now point the code location to inserted main.jsbundle file for that we should first go to AppDelegate.m file of our App then
1. Comment the following line
[source=’c’]
jsCodeLocation = [NSURL URLWithString:@”http://localhost:8081/index.ios.bundle”];
[/source]
2. Uncomment the following line
[source=’c’]
jsCodeLocation = [[NSBundle mainBundle] URLForResource:@”main” withExtension:@”jsbundle”];
[/source]
Thats it run your App using Xcode and enjoy
FOR Android
Go to your projects path
compile your project using :
[source=’bash’]
./gradlew assembleRelease
[/source]
To install the apk
Connect your device and enter the command
[source=’bash’]
adb install {PATH_TO_APK}
[/source]
Thats it your apk is now ready to run without a development server
Credits
Nothing here is my original , I consolidated the blog with my own experience and from the following two links to make it easy for anyone who is trying to do this ,Thanks
1. https://gist.github.com/marty-wang/5a71e9d0a6a2c6d6263c
2. https://github.com/facebook/react-native/issues/240
iam having a bit problem your help would be appreciated . iam having problem when releasing my iOS application . with my simulator every thing is okay i can build the app but when releasing i am having freeze with white screen after passing the splash screen . in android cam not having this issue . dam using the same steps of build in production as @scgough : in the project folder in Terminal run react-native bundle –platfrom ios –dev false –entry-file index.ios.js –bundle-output main.jsbundle Drag the reference to the main.jsbundle file into XCode under myapp folder In XCode, open AppDelegate.m and uncomment jsCodeLocation = [[NSBundle mainBundle]… Open Product > Scheme > Edit Scheme then change Build Configuration to Release Select myapp under the project navigator and then: under TARGETS: myappTests > Build Phases > Link Binary With Libraries press + select Workspace > libReact.a and Add compile in XCode with the ../node_modules/react-native/scripts/react-native-xcode.sh
very thing is okay in debug mode even with real device , all my provisioning profil are Okay i really need help it is blocking me . “@expo/ex-navigation”: “^3.1.0”, “assert”: “^1.4.1”, “babel-preset-react-native-stage-0”: “^1.0.1”, “bamlab-react-native-smooch”: “^0.3.0”, “base-64”: “^0.1.0”, “browserify-zlib”: “^0.1.4”, “bytebuffer”: “^5.0.1”, “console-browserify”: “^1.1.0”, “constants-browserify”: “^1.0.0”, “dns.js”: “^1.0.1”, “domain-browser”: “^1.1.7”, “events”: “^1.1.1”, “https-browserify”: “0.0.1”, “install”: “^0.10.1”, “lodash”: “^4.17.4”, “mockdate”: “^2.0.2”, “moment”: “^2.19.1”, “net”: “^1.0.2”, “numeral”: “^2.0.4”, “path-browserify”: “0.0.0”, “process”: “^0.11.10”, “prop-types”: “^15.6.0”, “querystring”: “^0.2.0”, “querystring-es3”: “^0.2.1”, “react”: “16.0.0”, “react-native”: “0.49.3”, “react-native-crypto”: “^2.1.1”, “react-native-datepicker”: “^1.6.0”, “react-native-drawer-layout”: “^1.3.2”, “react-native-fbsdk”: “^0.6.3”, “react-native-fetch-blob”: “^0.10.8”, “react-native-form-idable”: “^1.0.2”, “react-native-gcm-android”: “^0.2.0”, “react-native-google-analytics-bridge”: “^5.0.1”, “react-native-http”: “github:tradle/react-native-http#834492d”, “react-native-i18n”: “^1.0.0”, “react-native-level-fs”: “^3.0.0”, “react-native-linear-gradient”: “^2.3.0”, “react-native-md5”: “^1.0.0”, “react-native-os”: “^1.1.0”, “react-native-push-notification”: “^3.0.0”, “react-native-randombytes”: “^3.0.0”, “react-native-root-siblings”: “^1.2.1”, “react-native-root-toast”: “^1.3.0”, “react-native-svg”: “^5.4.2”, “react-native-swipeout”: “^2.2.2”, “react-native-swiper”: “^1.5.13”, “react-native-system-notification”: “^0.2.1”, “react-native-tcp”: “^3.3.0”, “react-native-udp”: “^2.2.0”, “react-native-vector-icons”: “^4.4.2”, “react-redux”: “^5.0.6”, “react-static-container”: “^1.0.1”, “readable-stream”: “^1.0.33”, “redux”: “^3.6.0”, “redux-enhancer-react-native-appstate”: “^0.1.1”, “redux-logger”: “^2.7.4”, “redux-persist”: “^4.4.1”, “redux-saga”: “^0.14.3”, “stream-browserify”: “^1.0.0”, “superagent”: “^3.3.2”, “timers-browserify”: “^1.4.2”, “tty-browserify”: “0.0.0”, “url”: “^0.10.3”, “victory-native”: “^0.15.0”, “vm-browserify”: “0.0.4” appdelegate.m:
– (BOOL)application:(UIApplication *)application didFinishLaunchingWithOptions:(NSDictionary *)launchOptions
{
//jsCodeLocation = [[RCTBundleURLProvider sharedSettings] jsBundleURLForBundleRoot:@”index.ios” fallbackResource:nil];
NSURL *jsCodeLocation;
jsCodeLocation = [[NSBundle mainBundle] URLForResource:@”main” withExtension:@”jsbundle”];
RCTRootView *rootView = [[RCTRootView alloc] initWithBundleURL:jsCodeLocation
moduleName:@”x”
initialProperties:nil
launchOptions:launchOptions];
rootView.backgroundColor = [[UIColor alloc] initWithRed:1.0f green:1.0f blue:1.0f alpha:1];
self.window = [[UIWindow alloc] initWithFrame:[UIScreen mainScreen].bounds];
UIViewController *rootViewController = [UIViewController new];
rootViewController.view = rootView;
self.window.rootViewController = rootViewController;
[self.window makeKeyAndVisible];
[Smooch initWithSettings: [SKTSettings settingsWithAppToken:@”x”]];
[[FBSDKApplicationDelegate sharedInstance] application:application
didFinishLaunchingWithOptions:launchOptions];
return YES;
}
This is really an informative blog on the react native push notifications library, which is really helpful for us.