
First, let us see what is the Multi-tenant Application???
Multi–tenancy is an architecture in which a single instance of a software application serves multiple customers. Each customer is called a tenant.
Types of Multi-tenancy Models:-
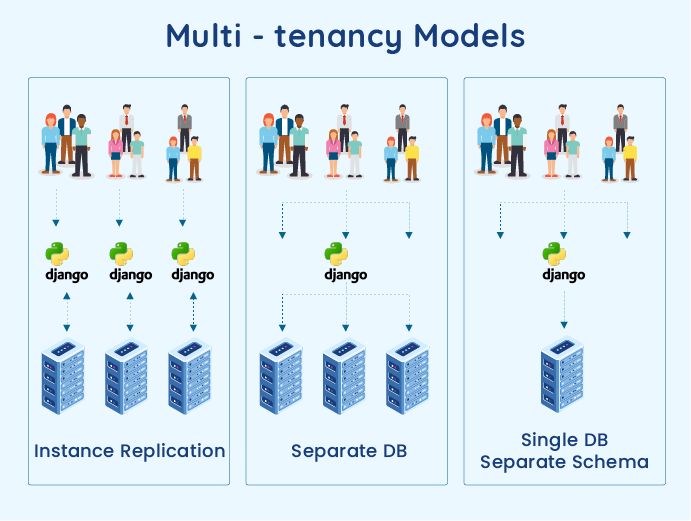
1. Instance Replication Model:- The system spins a new instance for every tenant. This is easier to start, but hard to scale. It becomes a nightmare when 100s of tenants signup.
2. Data Segregation Model:- There are two types of approach in a data segregation model. The first approach is a separate Database for each tenant and the second one is a single database for all tenant.
Part 1, Let us see how we can implement Django authentication part with multi-tenant application using second approach of Data segregation model.
Step 1:- As a first step, We should customize Django pre-build Login authentication. We override ModelBackend Class and added one more param(tenant) in the authenticate method and then pass the param to get the user model. Now, the Django will authenticate tenant objects as well.
from django.contrib.auth import get_user_model
from django.contrib.auth.backends import ModelBackend


class TestBackend(ModelBackend):
    def authenticate(self, request, username=None, password=None,
                    tenant=None, **kwargs):
        UserModel = get_user_model()
        if username is None:
            username = kwargs.get(UserModel.USERNAME_FIELD)
        try:
            user = UserModel.objects.get(email=username,
                                       tenant=tenant)
        except UserModel.DoesNotExist:
            # Run the default password hasher once to reduce the
              timing
            UserModel().set_password(password)
        else:
            if user.check_password(password) and
                self.user_can_authenticate(user):
               return user
Step 2:- We used django-rest-framework-jwt for authentication. We should customize the jwt token authentication. When we create JWT token at that time the Django rest framework library will authenticate Username and password but the multitenant approach we should authenticate tenant objects as well so we should customize authentication.py file. I have created one more method called authenticate_with_tenant and added one more param(tenant). Below is the authenticate_with_tenant method.
def authenticate_with_tenant(self, request, tenant):
    """
    Returns a two-tuple of `User` and token if a valid signature has been
    supplied using JWT-based authentication.  Otherwise returns `None`.
    """
    jwt_value = self.get_jwt_value(request)
    if jwt_value is None:
        return None

    try:
        payload = jwt_decode_handler(jwt_value)
    except jwt.ExpiredSignature:
        msg = _('Signature has expired.')
        raise exceptions.AuthenticationFailed(msg)
    except jwt.DecodeError:
        msg = _('Error decoding signature.')
        raise exceptions.AuthenticationFailed(msg)
    except jwt.InvalidTokenError:
        raise exceptions.AuthenticationFailed()

    user = self.authenticate_credentials(payload, tenant)

    return (user, payload)
Step 3:- Add one more tenant param in authenticate_credentials() method and replace the below code Here.
user = User.objects.get(email=username, tenant=tenant)Step 4:- Go to settings.py file and check REST_FRAMEWORK setting where you will be configured DEFAULT_AUTHENTICATION_CLASSES replace the ‘rest_framework_jwt.authentication.JSONWebTokenAuthentication’ to YOUR_FILE_lOCATION.JSONWebTokenAuthentication.
Step 5:- Create a middleware file to check every incoming request
from django.http import JsonResponse
from django.utils.deprecation import MiddlewareMixin
from rest_framework.status import (
    HTTP_404_NOT_FOUND
)

from .utils.jwt_authentication.authentication import JSONWebTokenAuthentication
from users.services import tenant_user_from_request, tenant_from_request


class AuthenticationMiddlewareTenant(MiddlewareMixin):

    def process_request(self, request):
        tenant = tenant_from_request(request)
        if tenant:
            jwt_authentication = JSONWebTokenAuthentication()
            if jwt_authentication.get_jwt_value(request):
                try:
                    email, jwt = jwt_authentication.authenticate_with_tenant(request, tenant.id)
                except Exception as e:
                    return JsonResponse({'error': {'message': str(e)}}, status=HTTP_404_NOT_FOUND)
                user = tenant_user_from_request(tenant.id, email)
                if not user:
                    return JsonResponse({'error': {'message': 'Invalid Tenant access'}},
                                        status=HTTP_404_NOT_FOUND)
                else:
                    request.user = user
                    request.tenant = tenant
                    # set_user_tenant_id(user.tenant_id)
        else:
            return JsonResponse({'error': {'message': 'Requested tenant is not available'}},
                                status=HTTP_404_NOT_FOUND)


def tenant_from_request(request):
    hostname = hostname_from_request(request)
    subdomain_prefix = hostname.split(".")[0]
    return Tenant.objects.filter(subdomain_prefix=subdomain_prefix, active=True).first()


def tenant_user_from_request(tenant_id, email):
    return User.objects.filter(is_active=True, email=email, tenant=tenant_id).first()
In Part 2 : we will see how we are maintaining tenant id in all tables to achieve single Database with separate schema(illustrated in the above image)
Is there any github code associated with this application?
can i get the link to the second part thanks
https://balavenkatesh.medium.com/how-to-build-a-multi-tenant-application-with-django-rest-framework-part-ii-fcf3d1ae95be Link to part II. All the best.