
I would like to discuss about full calendar gem in this blog.
FullCalendar is a fantastic jQuery plugin that gives you an event calendar with tons of great AJAX wizardry, including drag and drop events.
In this blog, I will guide you through the steps of integrating the calendar with Ruby on Rails application by using one of the new features which includes Rails 4 by default: jbuilder.
Let’s create the rails application check_calendar by running the following command.
[source language=”ruby”] rails new check_calendar [/source]
Go to the rails application directory.
Create a scaffold called “Appointment” with some attributes by running
[source language=”ruby”] rails g scaffold Appointment title:string description:text start_time:datetime end_time:datetime [/source]
Now run the following:
[source language=”ruby”] rake db:create
rake db:migrate
rails s [/source]
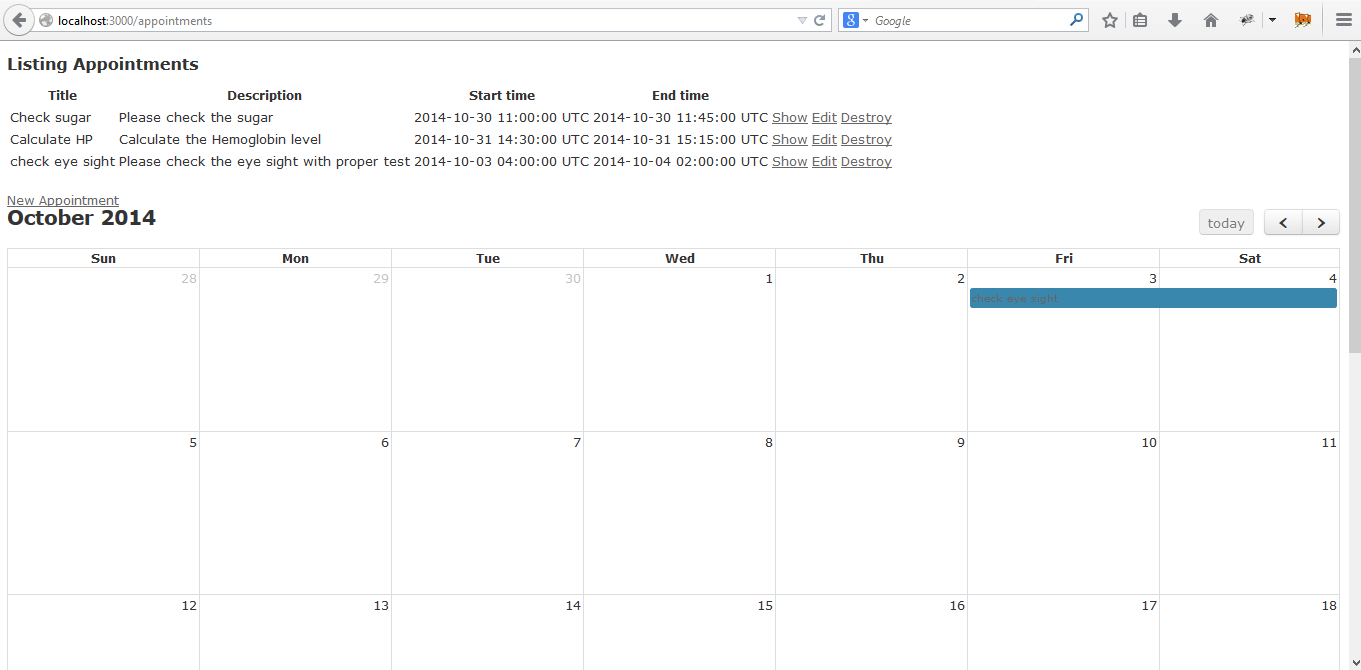
Then visit http://localhost:3000/appointments to see the list of appointments
Let’s create some appointments.
In order to show the appointments, we need to set-up a calendar.
We can download the required assets from the FullCalendar web page or by using the FullCalendar-rails gem. In our case, we need to add our Gemfile.
[source language=”ruby”] gem ‘fullcalendar-rails’
gem ‘fullcalendar_engine’ [/source]
And then run the following code snippet.
[source language=”ruby”]bundle install[/source]
Now the files are available in the assets pipeline’s path. Include these files in our application.js and applications.css files:
In application.css, add
[source language=”ruby”]*= require fullcalendar_engine/application[/source]
And in our application.js, add
[source language=”ruby”]//= require fullcalendar_engine/application[/source]
then in index.erb page under app\views\appointments, add the below line.
[source language=”ruby”]
$(document).ready(function(){
$(‘#calendar’).fullCalendar();
});[/source]
And now we have our fullCalendar up and running successfully 🙂
We need to set on how the appointments are going to be displayed.
The scaffold which we used to generate the application, provides us with a handy way of adding JSON support: we can take a look at app/views/appointments/index.json.builder file and see the default format it provides:
[source language=”ruby”]
json.array!(@appointments) do |appointment|
json.extract! appointment, :id, :title, :description, :start_time, :end_time
json.url appointment_url(appointment, format: :json)
end[/source]
It just takes all the appointments and its attributes and creates an array. We can view the result by visiting localhost:3000/appointments.json
It looks very close to the format fullCalendar but it needs a couple of changes to make it match:
[source language=”ruby”]json.array!(@appointments) do |appointment|
json.extract! appointment, :id, :title, :description
json.start appointment.start_time
json.end appointment.end_time
json.url appointment_url(appointment, format: :html)
end[/source]
We have to rename the start_time and end_time to start and end.
Additionally, we need to change the format of the URL attribute from :json to :html.
Let me explain this in the next step.
Now, our backend provides us with a JSON response in the same format as fullCalendar needs, we need to send proper params where we initialized our fullCalendar.
[source language=”ruby”]$(‘#calendar’).fullCalendar(
events: ‘/appointments.json’
);[/source]
We are done! Now our calendar shows the events that we have added.
I believe that you got an idea about how to use full_calendar gem. In my next blog,I would like to discuss about changing the style of calendar and creating appointments via calendar.