
A recent announcement from Android made us update our app support x64 architecture. This results in the fat app. Big in size approx. from ~25 MB to ~38 MB. and so finally we ended up in a story to reduce our android app in size. I will tell you how I did it.
The Problem starts here…
To make a better result in app size, we have used the following techniques and methods. This method comprises removing all unused methods, classes, fields, attributes, and resources
1. Try the New R8 Code Shrinker
Code shrinking can help to reduce the size of your APK by deleting unused code and resources. It shrinks code faster than ProGuard.
android.enableR8=true2. Enable Resource Shrinking
It can help to use resource shrinking to identify and remove unnecessary resources.
buildTypes {
  release {
  shrinkResources true
    .
    .
    .
  }
}
3. Android Studio’s APK Analyzer
This tool helps to explore the absolute size of your APK.
To analyze an APK, just select Build ->Analyze APK from Android Studio’s menu bar.

APK Analyzer
4. ResConfigs
It will remove all the other localized resources while building the application.
buildTypes {
      release {
        shrinkResources true
        resConfigs "en"
        .
        .
      }
    }
5. To compress images
To compress the image assets that you have used in your app, add this line to build.gradle, in android {} section
aaptOptions {
     cruncherEnabled = false
    }
Android App Bundles
And we’re ready to deploy the app to Play store.
In Google I/O 2018, Android studio introduced concept called “App Bundle”, the new way of publishing format to build and deliver your app.
Some of the giant app that uses App bundle method to make great result in app size
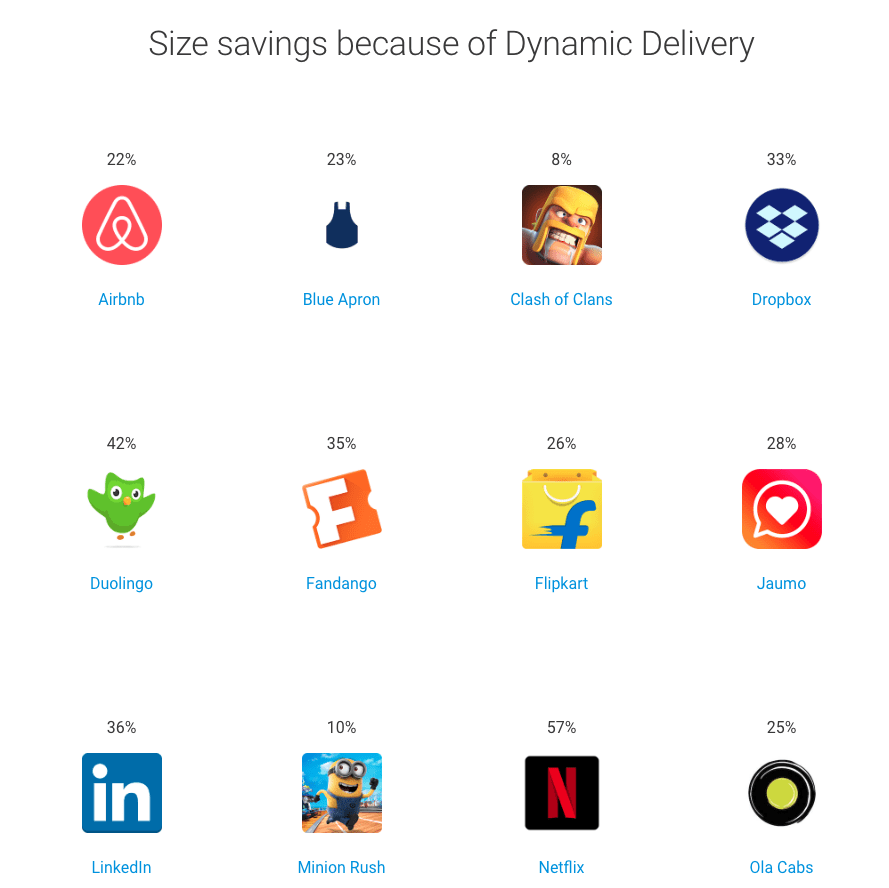
Image Source: Android developer
To publishing your app in this new Android App Bundle (.aab) format, you should be able to reduce the size of your APK by an average of 35%.
Once you’ve uploaded your app as a .aab file, Google Play will use this single file to generate
- A base APK containing all the code and resources required to deliver your app’s base functionality. Everyone who downloads your app will receive the same base APK.
- Multiple configuration APKs, which are tailored to different device configurations. Every time someone downloads your app, they’ll receive a configuration APK that’s tailored to their specific device and contains only the code and resources they actually need.
To build your app as a signed Android App Bundle, To select Build -> Generate Signed Bundle/APK from the Android Studio toolbar. Then select the Android App Bundle checkbox, and then click Next.
Now, open the module dropdown, and choose the app as your base module.
Follow the on-screen instructions to complete the build process. Android Studio will now generate a .aab file and store it in your AndroidAppBundle/app/release directory.
While signing an app bundle with an existing app, check the box next to an Export encrypted key and specify a path to save your signing key as an encrypted *.pepk file.
When you’re ready to upload your .aab file to Google Play. While uploading the Android App Bundle must be enrolled in App Signing by Google Play.
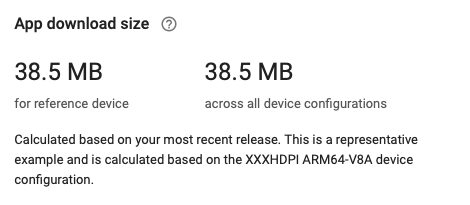
Result
We made it. We reduced it from ~38MB to ~15MB

Final App bundle size