

Google Colab offers free 12GB GPU enabled virtual machines for 12 hrs. If you are like me who couldn’t afford GPU enabled computer, Google Colab is a blessing.
Check out my other blog post on Real-time custom object detection using Tiny-yoloV3 and OpenCV to prepare the config files and dataset for training.
So, I’m assuming you have the following necessary files
- custom_cfg (folder containing the following files)
.cfg file(modified yolov3-tiny.cfg according to no. of classes),
.data file,
.names file,
train.txt (training data set),
test.txt (testing data set),
darknet53.conv.74 or other intermediate .weights file - custom_dataset (folder containing training images and their yolo object bounding box values)
Let’s get started.
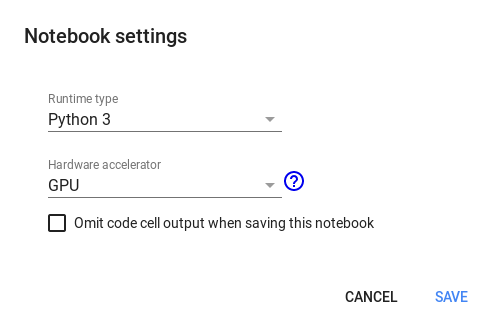
1. Create a Google Colab Jupiter notebook
Goto Google Colab and create a new Jupiter notebook and set it to use GPU.
2. Connect your Google Drive account
We need to transfer some files to VM. We can do with git or with Google drive. We will use Google Drive to transfer large files and training images. Create a code block and run this code
from google.colab import drive
drive.mount('/content/gdrive')
You will be asked to authenticate with your Google account. Once done, you can access your drive contents under ‘/content/gdrive/’.
%ll /content/gdrive/My\ Drive/
2. Install cuDNN
CUDA is Nvidia’s language/API for programming on the graphics card. cuDNN is a library for deep neural nets built using CUDA. It provides GPU accelerated functionality for common operations in deep neural nets.
Download the cuDNN similar to the CUDA version installed in your VM. To check CUDA version, run command
!/usr/local/cuda/bin/nvcc --version
Upload the cuDNN file to your Google Drive. Then extract that file in ‘/usr/local/’ folder
!tar -xzvf /content/gdrive/My\ Drive/cudnn-10.1-linux-x64-v7.6.5.32.tgz -C /usr/local/

!chmod a+r /usr/local/cuda/include/cudnn.h
3. Install Darknet in your VM
Darknet is an open-source neural network framework written in C and CUDA. You can clone Darknet repo directly in VM. However, we need to edit some files in this repo and we cannot edit directly in VM. So, fork the repo and make changes.
Change line.no 1 and 2 in ‘Makefile’, set the value to 1. This will enable Darknet to use GPU. commit and push the changes.
Then to clone your forked repo in VM. Run command
#clone the repo
!git clone
Compile Darknet
#cd into the darknet
%cd darknet

#Compile Darknet
!make
4. Upload your config files and training data
Upload the custom_cfg and custom_dataset folder into your Google Drive and move those into your VM darknet folder
!cp -a /content/gdrive/My\ Drive/custom_cfg /content/darknet/

!cp -a /content/gdrive/My\ Drive/custom_dataset /content/darknet/
6. Lets train
Run this command to start training
!./darknet detector train custom_cfg/licence_plate.data custom_cfg/licence_plate.cfg custom_cfg/darknet53.conv.74 -dont_show

once your training gets completed you will get final_weights. you can see intermediate weights for every 100 iterations until 900, then for every 10,000 iterations in folder ‘darknet/backup/’. you can move those file to Google Drive and download from your Google Drive account
That’s all folks, your model is trained.
Hi. I am creating a dateset on one class to detect people. When I start the training it gets to layer 15 before I get a “Cuda malloc failed” and “darknet: ./src/utils.c:326: error: Assertion `0′ failed.” I followed all the steps provided and even had to resolve a few other issues I ran into but I can’t seem to resolve this issue. Any recommendations?
Thanks in advance.
I’m not sure, I guess the GPU doesn’t have enough memory. Can you try decreasing the batch size or increasing subdivisions in .cfg file
This is because the file path to open cv ( image or video ) is wrong …. kindly check it
Hello,
Thank you for excellent tutorial Javeed. I’ve followed all the steps that you mention but I find myself stuck at training step. When I run step 6 I get following error:
” ./darknet: error while loading shared libraries: libcudnn.so.8: cannot open shared object file: No such file or directory “.
I’ve installed cuNN correctly and I can see it on my colab directory along with libcudnn.so.8 file but unfortunately I cant find a way to access it while training, please help.
Solved it by running command: “!ldconfig /usr/local/cuda/lib64” before training step. I guess might help someone
Thank you!
Thanks bro, But I am having problem in uploding cuDNN file to colab. Please help.
!tar -xzvf /content/gdrive/My\ Drive/cudnn-10.1-linux-x64-v7.6.5.32.tgz -C /usr/local/
when i am downloading cuDNN file for linux from nvidia site I am getting “cudnn-10.1-linux-x64-v8.0.5.39.solitairetheme8” file downloaded. I am not getting any tgz file.