
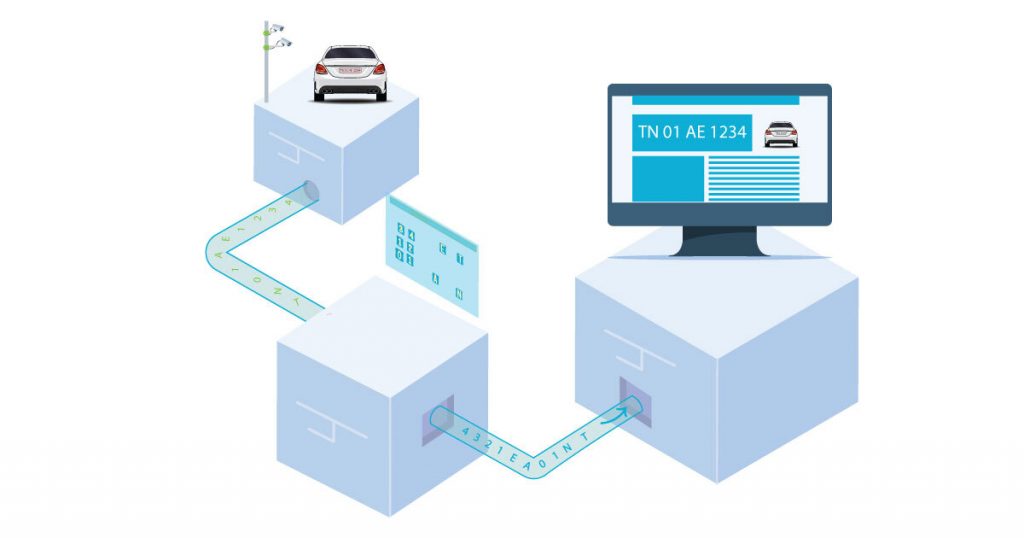
Hello everyone, when we were working on OCR I found myself wondering if there was an object detection based OCR model that would work specifically for license plates.
I wondered if the task would be as easy as transfer learning because training an object detection model from the ground up, and fine-tuning it, is no easy task, and we cannot use two separate models because of problems like concurrency between passing outputs, latency, and subsequently the cost of the product.
That is when I thought of exploring ways of combining two different models that are built for two different tasks to get the desired output.
So, I want to discuss combining different machine learning models built for different purposes using Tensorflow 2.0 today
In this blog post, we are going to consider the problem of OCR to discuss this technique. We use the MNIST Handwritten digits Dataset as the dataset to test our approach.
OCR – Optical Character Recognition
OCR or Optical Character Recognition is a field that deals with recognizing characters (or texts) written or typed from an image
One very prominent example of this problem is MNIST Handwritten digits datasets. It has been discussed time and again and many different approaches have been suggested to recognize the characters accurately
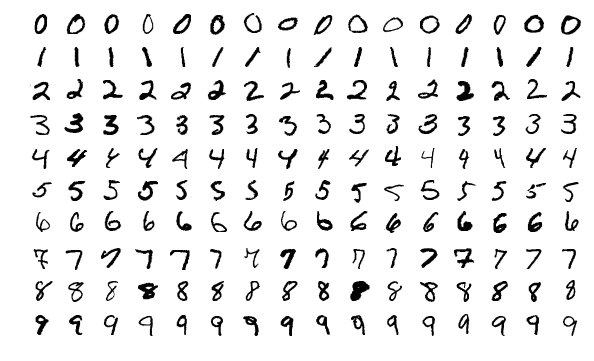
Image Attribution: https://en.wikipedia.org/wiki/MNIST_database#/media/File:MnistExamples.png
The simplest approach is to use two layers of fully connected neural networks (or Dense Layers in Tensorflow) for individual character recognition
Our Solution
Simple solution architecture:

The step-wise solution:
- Prepare the dataset
- Train an Object Detection Neural Network
- Train a single character recognition neural network
- Create a Multiflow model(capable of processing n-inputs to produce n-outputs) by building the model architecture and copying the weights of the single character recognition algorithm
- Connect the output of object recognition to a custom layer that performs tf operations (swap dimension, crop and resize, convert to grayscale, reshape)
- Connect the output of the custom layer to the multi-flow model
1. Preparing the dataset
Since we want to simulate a license plate we have scattered a random amount of random digits from the dataset which contains 60,000 images.
I stored these starting points and ending points as the annotations.
I used the https://github.com/fizyr/keras-retinanet repository for building and training the object detection model
The Retinanet object detection model requires two files one for annotations and one for mapping classes to ids
Details about the formatting can be found here: https://github.com/fizyr/keras-retinanet#csv-datasets
Some images from the prepared dataset


2. Train an Object Detection Model
Retinanet
Retinanet is a single-stage object detection model and it is fast.
RetinaNet uses a feature pyramid network to efficiently detect objects at multiple scales and introduces a new loss, the Focal loss function, to alleviate the problem of the extreme foreground-background class imbalance
https://keras.io/examples/vision/retinanet/
Thanks to the https://github.com/fizyr/keras-retinanet repository I was able to build and train the Retinanet object detection model very quickly
Training Retinanet
The model is trained on 400 images for 10 epochs in 100 steps with Resnet50 backbone using adam as an optimizer and 2 loss functions:
- Smooth L1 for regression
- The focal loss for classification
There is an awesome feature given by the repo which converts the layer to a prediction model, which adds a layer at the end which filters the outputs and returns the outputs in descending order of scores (or, confidences)
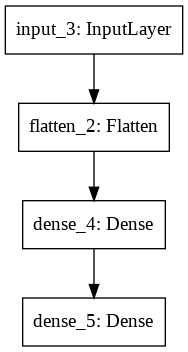
3. Single Character Recognition Model
The network architecture diagram
I used 60,000 images as input and 10,000 images for testing
The optimizer used is adam and the loss function is Sparse Categorical Cross Entropy
After training for 10 epochs the accuracy is 97.90%
4. Multiple inputs and outputs model
The network architecture diagram
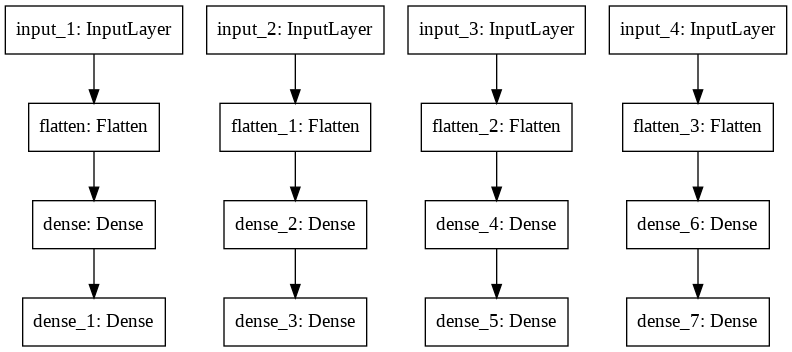
Here, the architecture weights are copied from the previous model and are set to this model using get_weights() and set_weights() of TensorFlow, two very useful functions
5. Custom Connection Layer
This is where the magic happens.
We need to consider 2 things here:
- The input of the multiple character recognition model
- The output of the Retinanet model
The input of the multiple character recognition model is 4 grayscale images of size 28×28
The output of the Retinanet model is boxes, scores, and labels
To connect these two layers, I made the initial inputs and the outputs of Retinanet as inputs of custom layer
We need to make the cropped the images using the first 4 bounding boxes and resize them to 28×28 size images and in order to do that we first need to swap the axes
The steps performed in the custom layer:
- The output box will be in the format of x1,y1,x2,y2 and the input of the operation tf.image.crop_and_resize() should be in the format y1,x1,y2,x2 and it be normalized to 0 to 1
- I used the function tf.scatter_nd() to swap the axes,
- Now we need to convert the cropped image to grayscale and for this, I have used tf.image.rgb_to_grayscale()
- Now reshape the grayscale image to 28×28
- The grayscale images should be normalized to a value of 0 to 1 and the outputs should be rounded off to the nearest whole float number using tf.math.round()
6. Connecting Custom Layer to Retinanet and character recognition model
The custom layer is connected to the Retinanet output using simple FunctionalAPI format of Tensorflow
The multiple character recognition model is now connected to the custom layer and the output is predicted
The Results
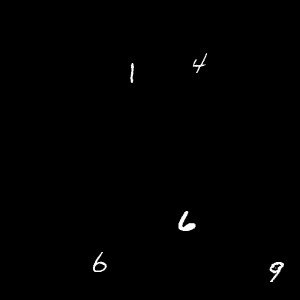
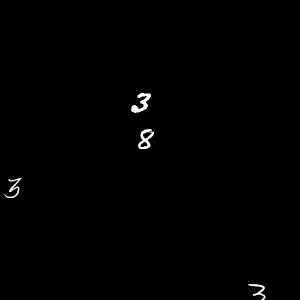
The input images
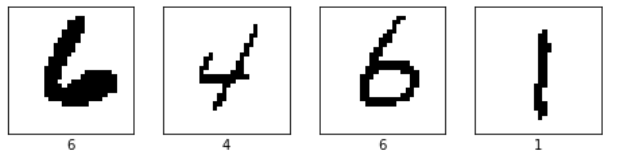
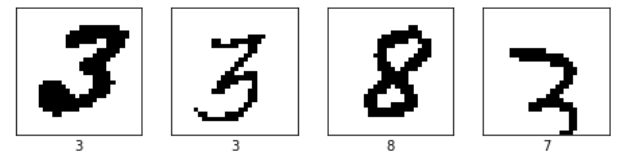
The outputs
Conclusion
This technique opens up many possibilities where we can leverage the full benefits of several models and create new and efficient models without the need for extra servers or worrying about concurrency and latency issues.
What do you feel about the little experimental project?
Please let us know your thoughts and queries in the comment section below.